I have a Matterport virtual tour but I want to be able to show people just one or two of the views without sharing the whole virtual tour?
There are several options allowing you to do this, including some listed in the next section below. It’s very common within a virtual tour to have a combination of areas you’d be happy to be seen publicly, and areas you need to keep hidden from public view. The easiest and fastest way to do this is to extract the required 360 degree images and host them separately. You can then embed them individually and separately from the Matterport virtual tour meaning you stay in control of what people can see publicly.
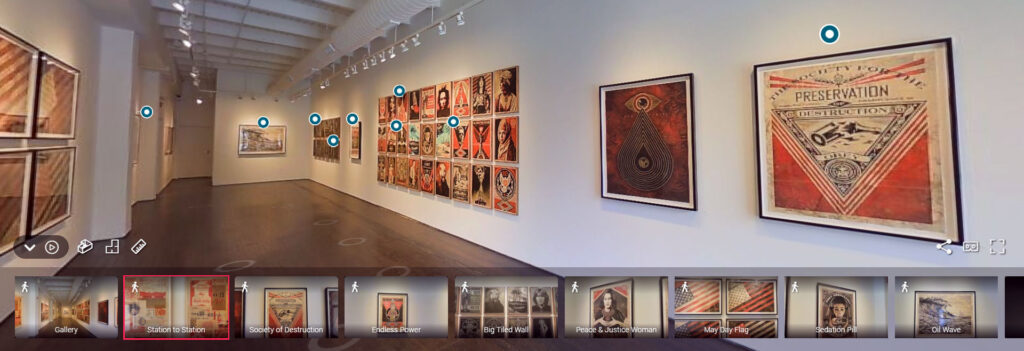
This example is an image extracted from a virtual tour we did for Wentworth Woodhouse. It’s interactive and allows you to view in all directions. It’s the same resolution and quality as the Matterport images (HDR) but is added individually and separately from the tour itself (view in full screen using the bottom-right option within the image):
How do I allow my Matterport virtual tour to be viewed publicly, but also keep certain areas private for internal company use?
Say you’ve got a Matterport virtual tour of, for example, a large office, factory, or workshop. Most of it is fine for anyone to see, but there are some areas which are either private or you’d rather people not see. What do you do?
- Disabling certain scans means they’re disabled for everyone. Virtual tours are often used within companies for internal company use as well as public use, so this isn’t an option. Also, the ‘doll’s house’ and ‘floor plan’ views will still show the areas.
- Delete certain scans means those areas are permanently gone. No one will be able to view these areas and we won’t be able to get them back either
There is one more option that not many people know about. Simply make two versions of the tour. One will full access for the private company use, and one with the private areas deleted for public viewing. It’s very fast and easy to create a copy of a virtual tour, and then the copy can be edited as required without having to make any changes to the original virtual tour!
How do I easily & quickly show someone a specific area within my virtual tour?
It’s very common that people need to show someone a specific area within the tour. For example, someone is coming to your building for a job interview, or more commonly, you want to describe to trainees which training rooms they’ll be using and what they look like. Other reasons include buildings where certain rooms or areas are for hire and you want to show the prospective customer more specifically which areas are available, e.g. kitchens, toilets, meeting rooms, etc. But what is the easiest and quickest way to do it?
- In-person is not always an option
- Sending a screen capture defeats the object of having a virtual tour and doesn’t allow people to explore
- Describing to someone how to get there either in an email or over the phone can be difficult and time-consuming
- Adding the area in question to a highlight reel means that’s there for everyone and may be confusing
There is actually a really quick and easy way to send someone a direct link to a particular view within a Matterport virtual tour, and it doesn’t take any editing. Simply finds the view you’d like to show someone within the tour and press ‘U’. You’ll be given a direct link to that view you can now send my email. Clicking the link will open the tour right there.
Also, very usefully, you can embed multiple versions of your tour that open directly in a specific place, bypassing the pre-defined virtual tour start place. Say, for example, you have many rooms within a large office block that are available for hire, and each of these rooms has its own page on your website. Simply create the direct link from the tour and replace the URL in the iFrame embed code to embed a version of the virtual tour which opens directly at that specific view.
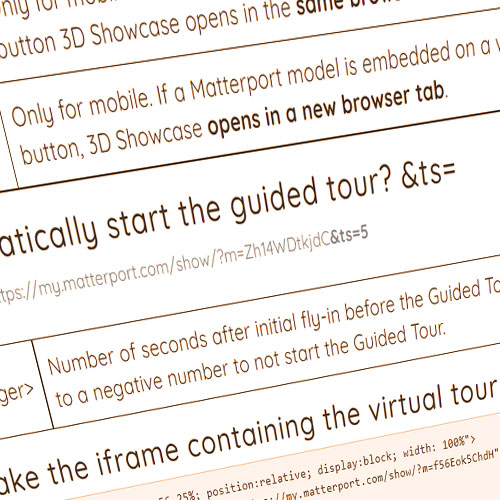
How I disable default features like the Doll’s House view when the tour is first opened, or start the virtual tour highlight reel automatically?
Many of the features within the virtual tours are there by default and are not able to be deactivated using the standard editing process. However, it is still possible to adjust many of these.
A standard website address, or direct link to a virtual tour, is described as a URL. This is something we’re all familiar with – an example URL is www.sevencreative.co.uk. However, other information is often appended to a URL which is normally used for more dynamic or bespoke purposes. A common example of this is where many sites include information about where the visitor was before they clicked the link (this information is usually referred to as ‘referrer’ information) – these extra bits of information are known as ‘URL parameters’. They’re easy to spot as they normally follow a ‘?’ in the URL (examples below)
There are many URL parameters you can add to a virtual tour link, including automatically starting the ‘highlight reel’ or automatically showing the ‘navigation tips’ when the tour starts. These URL parameters can also be ‘stacked’ meaning you can include several in one URL
A common example is to disable the automatic ‘doll’s house’ view which is how the Matterport virtual tours start by default. This is easily done by the URL parameter ‘&dh=0’ to the end of the URL. Here is an example:
- Original (doll’s house enabled)
- With the URL parameter added (doll’s house disabled)
Click here for more information on URL parameters
How can I display my virtual tour as a film?
Due to the interactive nature of the virtual tour, it’s not always possible to include it in third-party websites in the same way that you can often do with a YouTube or Vimeo film. Other times, it would simply be useful to send someone a link to the virtual tour as a film without the required interactivity. So what are the options?
The first, and easiest, is to simply record the screen as you move around the virtual tour. This produced a film file which can be edited in the normal way and sent directly or uploaded to one of the streaming platforms like Vimeo or YouTube. For more information on this option, see this link
The second option is to create a highlight tour (if you’ve not done so already) and use the URL parameters (as described above) to automatically start the tour when the tour starts.
—
0 Comments Leave a comment